

Tools needed for beginners
Metal clay - malleable metal, it can take any desired shape and texture. This, due to the fact that it is a flexible material (due to the organic binder), similar to ceramic clay, cold and soft, but much heavier, due to the composition of up to 95% metal particles. Therefore, it can be modeled with the help of fingers, textures or molds or even worked on the potter's wheel. It can also be carved easily. We can make infinitely many combinations between different shapes and textures, it's all about using our imagination.
Speaking of tools, many of them are also found in our house. Here are some of them.
- Common toothpicks are frequently used in projects with metal clay. They are used to drill, as a drying support, to clean the surface of stones or to apply resin or epoxy glue.
- Olive oil is a lubricant substitute CoolSlip. Grease your hands, surfaces and textures with it to avoid sticking metal clay.
- Light bulbs. They provide an ideal drying support to create concave shapes.
These are just some of the most used, and each project can inspire us to use other objects in the house or even some children's toys.
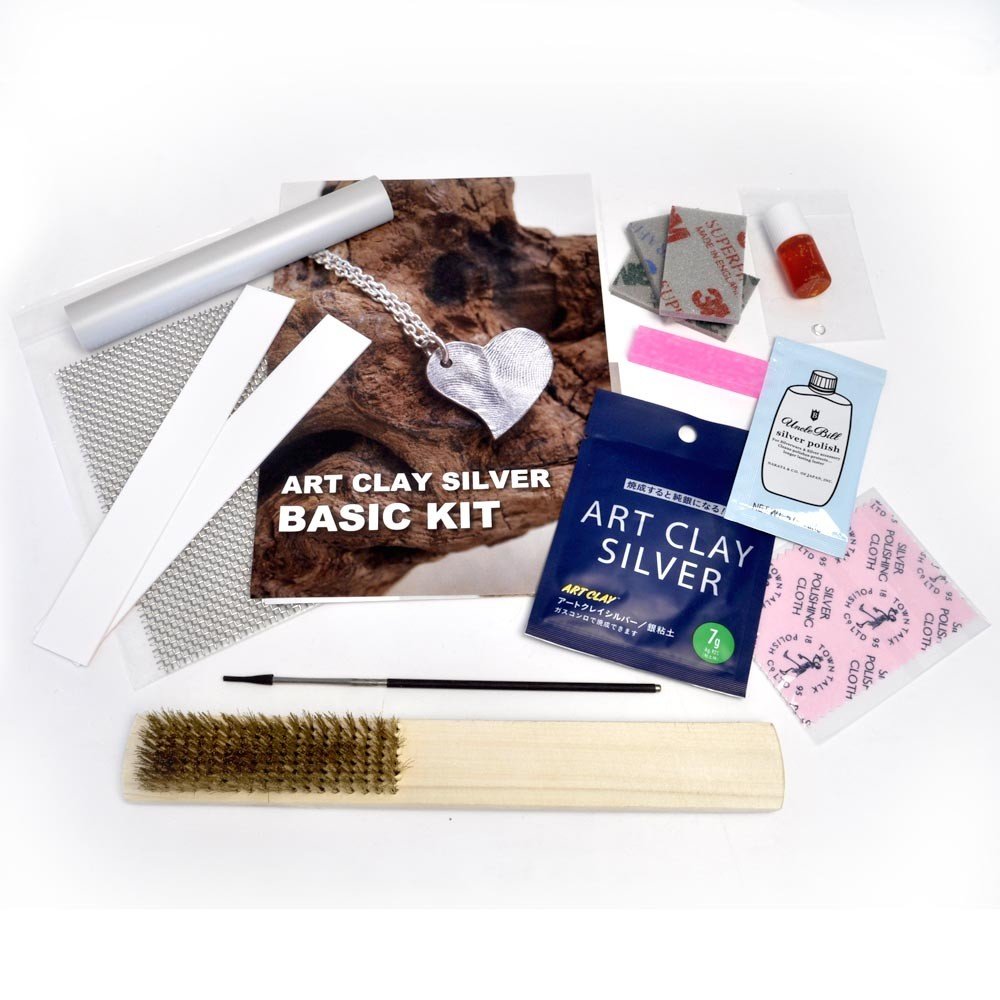
Kits metal clay
Of course we want to create sophisticated and professionally crafted jewelry, and for these there are special tools and accessories that help us focus only on creation.
When you are at the beginning of the road you can first opt for a kit that contains the minimum necessary to create a piece of jewelry (Art Clay Silver Starter KIT ). In time you can move on to the next level, such as creating rings (Art Clay Silver Starter KIT Rings). If you want to create more jewelry or you want to get serious, you can opt for the kits Basic or Deluxe. They contain a series of projects in video format, which you can watch on your computer. In addition, they also contain tools.
If you want to ask us for advice on the tools needed to build your small workshop, you can contact us and we can create a custom kit.

Modeling
But let's see what exactly we need in working with metal clay! We will start with modeling.
- Lubricant - to prevent the clay from sticking to metal, surfaces, textures, etc. For deeper textures we recommend using spray CoolSlip
- Work surface - the area on which we roll / model the clay. It can be a modeling surface: self-healing plaque or surface covered with Teflon
- Teflon sheet - ideal for multi-part projects. Resistant to 260 ° C
- Document protection foil - for projects that require the creation of the piece according to a drawn pattern
- Roll
- Thickness spacers or CoolTools frames, which allow the clay to roll from any angle.
- Water container - small, made of glass or used for painting
- Demineralized water - used in moisturizing clay, as well as in antiquity
- Small glass or plastic containers that have a lid - ideal for creating paste
- Brushes - tank brush, thin sharp brush, flat, medium round and rough, for cleaning stones
- Clay storage container
- Plastic foil for food - to cover or wrap fresh metal clay, to keep it moist and store it.
- Rechargeable sprayer - for applying water over light or completely dry clay
- Professional needle
- spatula - used for filling gaps or for texturing, and modeling
- Cutting and slicing tools - blades (flexible and rigid), scalpel or knife (sculpture), adjustable knife (for cutting ring strips), Parallel Strip cutter (cutting the strips)
- Cutters - polymer clay, fondant, sugar paste or biscuits
- Thin-walled metal tubes or plastic straw
- Design Templates with various shapes
- Textures - in addition to the manufactured textures, leaves, toys, wallpaper, etc. can also be used.
- extruder - used to create threads (sausages) of various shapes
- Silgum two-component mold - recommended for taking molds on various surfaces: twigs, shells, etc. It hardens quickly and captures fine details
- Wooden clay Mokunen San - with it you can create pieces with volume, empty inside
- Air drying clay - Vira White and Terracotta – it is used to test part models, before creating them from the metal in the form of clay. After drying it can be filed, sculpted and can be a support or texture for metal clay. (Warning! This one is not metal clay, it's a hobby-clay, which only dries in the air, it DOES NOT burn.)
Finishing
After the pieces have dried, a very important step is finishing. The following tools can also be used after burning the parts in the polishing process:
- Hand drill with drills
- Needle files - we recommend that you do not use the same files for several types of clay
- Abrazive sponges (red, blue, green) use in this order
- Disks and abrasive rods
- Emery paper - abrasiveness 320, 400, 600, 800, 1000, 1200, 2000
- Wet wipes - we recommend those for babies (Sensitive - without perfume or alcohol)
- Paint brushes


Firing
Depending on the type of metal used, you will apply certain firing methods. In addition to the fire source, you will also need surfaces or containers.
- Shelf - for firing in the oven or with the torch
- Firing board or soldering block - to fire or solder the parts with the torch and to support the hot parts, taken out of the oven
- Tripod - used in several fire applications, such as: enamelling, keum-boo technique, etc.
- Stainless steel mesh support - for burning parts with or without enamel
- Stainless steel mesh - a special set created for burning on the stove
- Steel container and activated carbon - for burning non-precious metals
- Protective eyewear - recommended for eye protection
- Long tweezers - used mainly for removing pieces from the oven
- Shovel - loading and unloading pieces or containers from the oven
- High temperature resistant protective gloves
- Different tweezers - for soldering, flat heads
- Burning kit - a complete kit with all oven accessories
- Deluxe combustion kit - a complete kit with accessories and Prometheus PRO1 oven
Cleaning, polishing and patina
After firing, it is time to highlight the shine of the parts, by polishing and / or skating. Parts of non-precious metals that have been burned in activated carbon, if removed when still hot, will begin to oxidize. To remove this oxide, clean it before polishing.
- Picklean - non-toxic solution, used for cleaning oxidized jewelry (precious and non-precious metals)
- Brushes with stainless steel bristles or made of brass - used for polishing freshly fired pieces
- Sanding sponges, sandpaper, abrasive cloths, files
- Pikal polishing cream - with little effort, you get a mirror finishing gloss
- Polishing Cloth soft - used as such to polish silver pieces
- Patina solution based on sulfur - skating parts